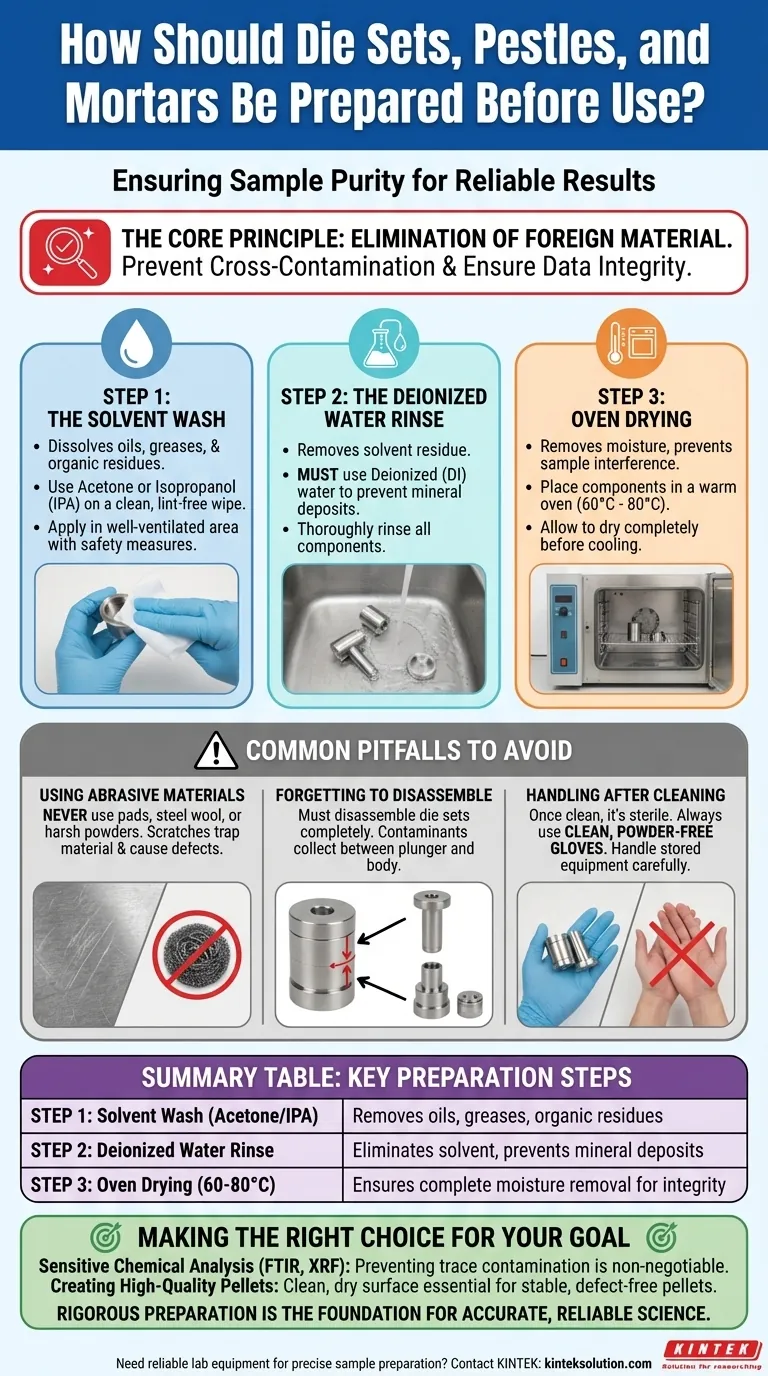
Before any use, a die set, pestle, and mortar must be meticulously prepared to ensure the purity of your sample. The standard procedure involves a thorough cleaning with a suitable solvent, followed by a rinse with deionized water, and finally, complete drying in a warm oven. This process removes residual contaminants from previous samples and the environment.
The core principle is not just cleanliness, but the complete elimination of foreign material. Failing to properly prepare this equipment is one of the most common sources of sample cross-contamination, which can invalidate analytical results and compromise the quality of your work.
The Principle: Preventing Contamination
The entire preparation protocol is built around one central goal: ensuring that the only material being analyzed or processed is your sample. Any residue, no matter how small, can introduce significant error.
Why Previous Samples Are a Threat
Even after physically removing a prior sample, microscopic traces can adhere to the surfaces of the die, pestle, and mortar. These remnants can easily mix with your new sample, a phenomenon known as cross-contamination.
For sensitive analytical techniques like spectroscopy or chromatography, this can lead to false positives or inaccurate quantitative measurements.
Why Environmental Residues Matter
Surfaces can also accumulate contaminants from the environment, such as oils from handling, dust, or airborne particles. A solvent wash is critical for removing these organic and non-polar residues that water alone cannot dissolve.
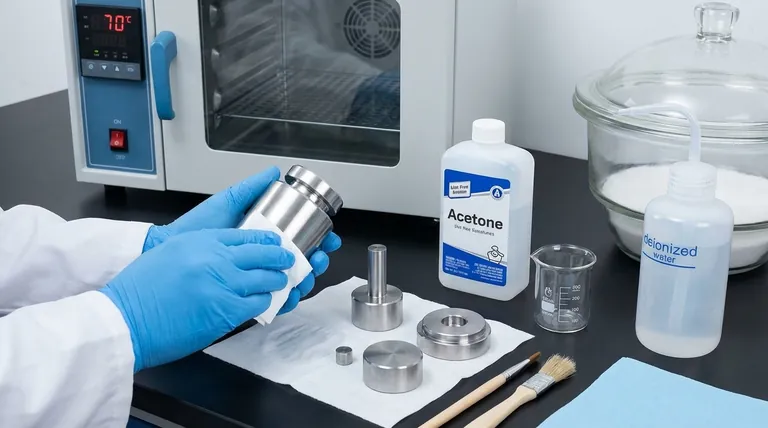
A Step-by-Step Preparation Protocol
Following a consistent, methodical process guarantees reliable and repeatable results. For a die set, ensure it is disassembled into its individual components (body, plunger, base) before cleaning.
Step 1: The Solvent Wash
The first wash uses a solvent to dissolve and remove oils, greases, and many organic residues.
Acetone or isopropanol (IPA) are common and effective choices. Apply the solvent to a clean, lint-free wipe and thoroughly clean all surfaces that will contact the sample. Ensure you are in a well-ventilated area and follow appropriate safety measures for the solvent you choose.
Step 2: The Deionized Water Rinse
After the solvent wash, you must remove the solvent itself.
Rinse the components thoroughly with deionized (DI) water. Using standard tap water is not acceptable, as it contains dissolved minerals and ions that will leave a residue on the surface upon drying, introducing a new source of contamination.
Step 3: Oven Drying
Moisture can interfere with sample preparation, especially for materials that are hygroscopic (readily absorb water).
Place the cleaned components in a warm oven, typically set between 60°C and 80°C. This is warm enough to evaporate all moisture efficiently without causing thermal damage to the metal or agate. Allow them to dry completely before cooling to room temperature.
Common Pitfalls to Avoid
Even with a defined protocol, mistakes can compromise your preparation. Awareness of these common errors is crucial.
Using Abrasive Materials
Never use abrasive pads, steel wool, or harsh scouring powders to clean die sets or mortars. The surfaces of this equipment, especially the pressing faces of a die, are highly polished for a reason.
Scratches create microscopic crevices where sample material can become trapped, making future cleaning difficult and cross-contamination almost inevitable. These imperfections can also translate to defects in your final pressed pellet.
Forgetting to Disassemble
For a die set, it is not sufficient to simply wipe the assembled unit. You must disassemble it completely before cleaning. Contaminants collect between the plunger and the die body, and these surfaces must be cleaned independently.
Handling After Cleaning
Once the equipment is clean, it is sterile. Handling the components with bare hands will immediately reintroduce oils and other contaminants.
Always use clean, powder-free nitrile or latex gloves to handle prepared equipment. Store it in a clean, covered container or desiccator until you are ready to use it.
Making the Right Choice for Your Goal
Apply this protocol rigorously, keeping your end goal in mind.
- If your primary focus is sensitive chemical analysis (e.g., FTIR, XRF): Preventing cross-contamination is non-negotiable, as even trace contaminants can completely obscure or alter your analytical signal.
- If your primary focus is creating high-quality physical pellets: A perfectly clean and dry die surface is essential for producing a stable, defect-free pellet with a smooth, glassy finish.
Ultimately, this rigorous preparation is the foundation upon which accurate, reliable, and repeatable scientific work is built.
Summary Table:
| Step | Key Action | Purpose |
|---|---|---|
| 1 | Solvent Wash (e.g., Acetone or IPA) | Removes oils, greases, and organic residues |
| 2 | Deionized Water Rinse | Eliminates solvent and prevents mineral deposits |
| 3 | Oven Drying (60-80°C) | Ensures complete moisture removal for sample integrity |
Need reliable lab equipment for precise sample preparation? KINTEK specializes in high-quality lab press machines, including automatic lab presses, isostatic presses, and heated lab presses, designed to meet the rigorous demands of laboratories. Our products help you achieve contamination-free results and enhance efficiency. Contact us today to learn how we can support your lab's success!
Visual Guide